Adding Pictures
 Adding
Pictures and images to your web page
Adding pictures is pretty easy.
Find a picture in the internet. Please choose a sunset or nature scene. Pick a picture which is more than 500 pixels wide.
Save the picture to you images folder in your web site. Open with Irfan Viewer and resize the picture to 300 pixels wide.
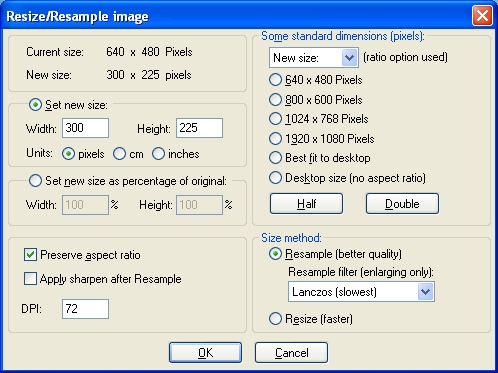
To resize a picture in Irfan Viewer, OPEN Irfan Viewer. Click IMAGE>>RESIZE/RESAMPLE. You should see:

Make sure "PRESERVE ASPECT RATIO" is checked, THEN change the width to 300. Click OK.
Save the picture into your images folder. It helps if you add the size to to the name such as mountain300.jpg.
Go to Dreamweaver.
Create a new page called pictures.htm. Open the home page and create a link under assignments to that page.
Open pictrues.htm and create or copy and paste you home page header table and the main table to the new page.
Change the table to a 2 column table. In the left hand column type "Picture Assignment"
In the right and column, delete whatever is there.
Place your cursor in the top left of the right hand column. If it is NOT at the TOP, then move the cursor to the top of the cell.
![]() Click
the "Image" Button. and insert your picture 5 times.
Click
the "Image" Button. and insert your picture 5 times.
Click on each image and align as directed below.
Image
1: Align Left button
Image 2: Align Center button
Image 3: Align Right button
Image 4: Align Left using the Align Drop Down
Image 5: Align Right using the Align Drop Down
Now add some random text around each of the pictures. What do you experince. Please show Mr. T.